Showing posts with label Google Docs. Show all posts

Tuesday, February 21, 2012

Cool Website of the Week - Flubaroo

Flubaroo is a free script that turns your Google Forms into incredibly easy to use automated assessments. With Flubaroo, you can create multiple-choice quizzes using Google Forms, assign them to students, create an answer key and then grade your students' work at the click of a mouse.

Image Source: Flubaroo

Click here to see a detailed overview of how to use Flubaroo. Or watch the video below:


Wednesday, February 8, 2012

Checking Revision History and Creating Drafts in Google Docs

With Google Docs you can easily track changes and revert to older files. This means that if you make a mistake, you can easily recover your work.

See Revision History


  1. In order to view older files, go to File>See Revision History. Information should pop up on the right of the screen.
  2. Click on older dates to see the state of the doc at that time.
  3. If you would like to, you can click "revert to this doc" in order to abandon all the changes you had made to that point.


One of the downsides to using Docs in a school setting, is that the editing process becomes seamless, almost invisible. For students who need to track the progression of their work in a portfolio, this can introduce issues.

Making "Draft" Copies


In order to ensure the existence of drafts, teachers can have students make a copy of their files at certain phases.

  1. Go to File > Make a copy
  2. Click the checkbox next to "Also copy document collaborators". This way teachers will automatically be added as editors to subsequent drafts.
  3. Click on the title to change the name of the document.
  4. In the popup box, enter the new name of the document and click OK.


Make sure that you introduce a  consistent naming/file structure (numbers of drafts, etc.) 

Tuesday, February 7, 2012

How to Comment on Student Google Docs & Spreadsheets

Google Apps allows for robust sharing, so multiple students and teachers can edit a document at the same time. Google Apps also makes it easy to comment, rather than edit on a document. These comments work similar to the commenting feature in Word.

Commenting on Google Docs


In order to comment on a student's Google doc, the student must first share their document with you. (Learn more about sharing in my post on Making a Google Docs Template.)

Once you access a student's document you can insert a comment wherever your cursor appears. If you select a block of text, a highlight will appear around the selected words, indicating a comment.

  1. Select text or place cursor where you want the comment
  2. Go to Insert > Comment
  3. Write your comment and press the blue Comment button
  4. Reply to other comments (or your own comment) by typing in the box below the comment and pressing reply.


Discussions in Google Docs

This video explains how you can use the comments to have a discussion on your Google Doc.


Commenting on Google Spreadsheets


To add a comment to your spreadsheet, follow these steps:
  1. Click the cell where you'd like to insert a comment.
  2. Choose one of the following methods to insert a comment:
    1. Right-click the cell and select Insert comment.
    2. Go to the Insert menu and select Comment.
    3. Use the keyboard shortcut Shift-F2.
  3. A yellow comment box appears with your username.
  4. Enter the text of your comment.
  5. To save your comment and close the comment box, click another cell in the spreadsheet or press Enter.
  6. An orange mark will show in the top right corner of the cell where you inserted the comment.
  7. To view a comment after it's been inserted, hover your mouse over the orange comment indicator. Click the comment box to keep it visible on the screen or to edit the comment.

Some of these directions were pulled from the Google Support Site.

Wednesday, February 1, 2012

Printing Google Docs

When printing a google doc, you may have to first download a PDF file to your computer.

(These directions come from the Google support website: http://support.google.com/docs/bin/answer.py?hl=en&answer=50089.)

Print in Chrome


When you print in Chrome, your Google document will print exactly as it appears in Google Docs. Because of this, there's no Print preview option. When your document is ready to print, follow these steps:

  1. From the document you'd like to print, select File > Print.
  2. A dialog box for your printer and print settings will open.
  3. When you’re ready, select the Print button.

Print preview and print in Firefox or Safari


To preview how your document looks before you print it, go to the File menu and select Print preview. This will generate a preview of what your document will look like when it's printed on paper. If you like what you see, move on to the following steps to print the document. Or, you can go back to editing.

To print a Google document in Firefox or Safari, follow these steps:


  1. From the document you'd like to print, select File > Print.
  2. A PDF file containing your document will automatically download. When the download completes, open the PDF file.
  3. In your PDF viewer, go to the File menu and select Print.
  4. A dialog box for your printer and print settings will open.
  5. Select the Print button.


You can also download a document to another file format, and then print that file. To download a document, follow these steps:


  1. From your document, to to the File menu and navigate to Download as...
  2. From the Download as... sub-menu, select the file format you’d like to download your document to.
  3. Find the downloaded file on your computer, and open it.
  4. Print the downloaded file.

Tuesday, January 17, 2012

Making a Google Docs Template

One of the great things you can do with Google Docs is create templates for your students. With these templates, you can create the rough skeleton of a project, and then share this template with students. Students will then make a copy of your template and update the content.

In these directions you can learn how to create your own custom templates. There is another way to more officially "submit" templates that can be shared by the entire community. For more on this, visit Lynda.com: Google Docs > 14. Using Templates

One way create a Template:


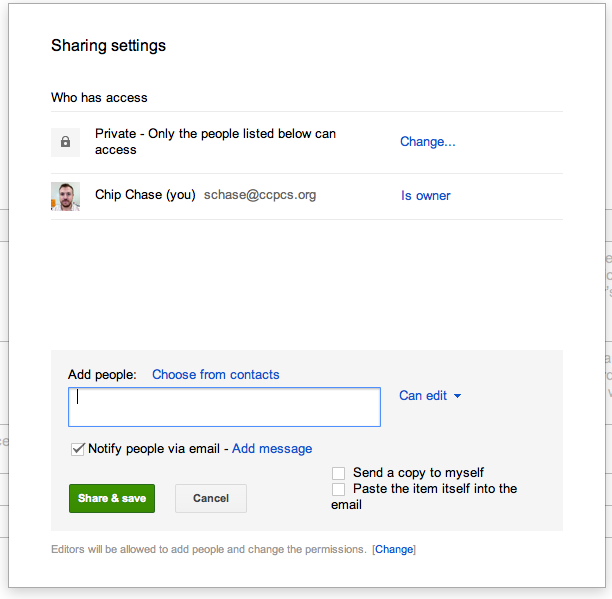
In order to create a template, make your document just as you would a regular assignment. When you are ready, share the document by clicking the blue "Share" icon in the top right corner.


On the next screen, you must add people, and then choose what type of editing access to give them. (Hint, add students by typing in their full first and last names, for example: "Chip Chase." The email should automatically appear.)


When adding students to a template, do not give them "editing" access. Instead, give them only the ability to "Comment" or "view" your document. This way, they will not be able to make changes to the template.


When students want to work on a template, they must:

  1. Make a copy of the template
  2. Change the title from (Copy of Template) to their own title.
  3. Students can change the field placeholders that you add.
  4. Students share the project with you.