Wednesday, November 14, 2012

EdTech Practices for 2012 - Online Instructional Resources


In order to kick off your use of technology in the classroom this year, consider using these resources to enhance your lessons!

This series of posts expands upon the list of resources collected for Mr. Chase's AIMS presentation: "Easy Innovations: Web Tech Tools in the Classroom" from last year:

Previous Posts:
  1. EdTech Practices for 2012 - Tools for the Process of Learning
  2. EdTech Practices for 2012 - Tools for Unique Learning Products

Instructional Resources

These tools ideal for teachers in planning for their instruction, and providing additional support to students.


Social Media:


  • Professional Learning Networks - These professional learning networks are a great, low-cost way for teachers to expand their personal and professional development. Communicate with other teachers, search for best practices, find and adapt free lesson plans. Join some of these robust educator's networks to jumpstart your instruction
    • Classroom 2.0 - Classroom 2.0 is a free, community-supported network focusing on issues surrounding Web 2.0 and social media.
    • Educator’s PLN - Join this teacher-based Ning to collaborate with educators from across the country. Ask questions about strategies and resources, share links and videos on a variety of subjects, and be a part of a greater educational conversation.
    • Claco (beta) - Request an invite to this community in order to "find, build and share resources with teachers across the hall or across the world — aligned with Common Core."

Learning Objects and Resources:


    • Online Lesson Plans & Learning Objects - Search these websites for quality lesson plans and learning objects to use in your classroom. 
      • The NYT Learning Network Blog - Find relevant and up-to-date lesson plans based on articles and stories from the New York Times.
      • Shmoop - This subscription-based service gives you access to high-quality literature guides, teachers resources, and more. Pay individually for specific lesson plans, or access free resources.
      • Edufy - "Find, share and edit high quality learning activities shared by other teachers with a focus on STEM education. Edufy makes great teaching easier by providing a broad range of activities that can be mixed and matched to build a learning experience to meet every student's learning needs on every topic."
      • Edutopia -Join the conversation or just search for quality lesson plans and instructional strategies on this site.
      • Teaching Central Pinterest - Search this Pinterest of recommended websites surrounding a variety of educational topics.
      • PBS Teachers - Find classroom resources and strategies sorted by age and subject level.
    • Online Courses - Use these sites to encourage students to take online courses in addition to, or as part of your course. Consider using lessons from these courses to augment your own classroom instruction.
      • No Excuse List - A helpful list of educational sites sorted by topic
    • Instructional Games - Consider using specially designed games to emphasize course concepts. More and more designers are creating free online instructional games, or platforms for teachers to create their own game specifically for their lessons. 
      • Jeopardy Labs - Create your own online “Jeopardy” game, or choose from already created games.
      • Class Tools.net - This free site lets teachers create free games, quizzes, activities and diagrams and host them on their own sites.
      • Games for Change - This organization aims to "leverage entertainment and engagement for social good" by creating and distributing "social impact games that serve as critical tools in humanitarian and educational efforts."
      • ABC YA - Use this site to find free instructional games modeled from primary grade lessons that are enhanced to provide an interactive way for children to learn.
      • A + Click - Math games for all ages and grades
      • Cookie - This site of educational games for elementary-age students are designed by child experts and educators.
    • Online Textbooks - Consider “remixing” your textbook, choosing free, online resources compiled together for your students. These sites help you collocate resources to make your own textbook, or contribute to free, open-source textbooks created by similar subject-teachers
      • Boundless (new) - Boundless markets itself as a free textbook replacement, using open educational content to create their materials.
      • CK-12 - CK12 is an open content, web-based collaborative model of customizable, standards-aligned K-12 textbooks. Available online, or for Kindle or iPad.
    • Creating Online Quizzes - 
      • Quizlet - Create flashcards with your own terms and definitions, or search from a database of flashcards. Share your flashcards with classmates, or assign them to students.
      • Google Forms + Flubaroo - With Flubaroo, you can create a grading key for online forms. 

    Video-based Learning Objects and Resources:

    Consider using videos in the classroom to augment your instruction. Teachers across the country are using videos to flip their classroom, assigning lectures for homework in order to free up more time for projects and hands-on learning.
    • Instructional Videos
      • Learnzillion - Watch videos created by teachers using Common Core lessons.
      • Teacher Tube - Share and access instructional videos and other resources, curated by a community of teachers
      • Teacher Domain -  Find thousands of media resources, support materials, and tools for classroom lessons, individualized learning programs, and teacher professional learning communities.
      • Khan Academy - This site has a host of instructional videos and learning resources.
      • HippoCampus (new) - The goal of HippoCampus is to provide high-quality, multimedia content on general education subjects to high school and college students free of charge.
    • Resources to Enhance How you Use Online Videos
      • Quiettube - Watch Youtube videos without all the clutter of comments and recommended videos.
      • Tubechop - Easily "chop" one section of a Youtube video. This tool is great for longer videos.
      • Study Egg - Formerly Zen.do, this site lets teachers add assessment questions to real-time videos. Notice, changes are taking place with the developers of this site.
      • Keepvid - Use this service to download versions of Youtube videos. This service helps when you know that your network will be heavily used.
    • Resources to Create Your Own Online Videos - Use these screencasting, and editing programs to create online folders.
      • Screenflow $99 – This software, the favorite of many bloggers and podcasters, allows you to “record the contents of your entire monitor while also capturing your video camera, microphone and your computer audio.”
      • Jing free (limited)/$14.95 per year – TechSmith, the makers of Camtasia, created this lightweight, easy-to-use screen capture software with both free and paid accounts.
      • Screenr free (limited)/variety of paid options- This web-based video recording system allows you to make webcasts without downloading any software.
      • iShowU $29.95 – This Mac-only screen-casting allows you to easily record your screen, as well as your video camera and microphone.
      • Camtasia $99 – One of the first screen-capturing tools, TechSmith’s Camtasia offers versions for both Mac and PC and is ideally suited for your screen-capturing and editing needs.
      • ScreenChomp (for iPads) – This app by TechSmith allows you to turn your iPad into a screen-capturing tool.

    Monday, November 12, 2012

    Handout for Interactive Whiteboards

    Teachers, are you curious about ways to use your interactive whiteboard in the classroom? Take a look at this Google Doc handout, or contact Mr. Chase directly.


    Tuesday, September 25, 2012

    EdTech Practices for 2012 - Tools for Unique Learning Products


    In order to kick off your use of technology in the classroom this year, consider incorporating one of these educational best practices into your classroom!

    This series of posts expands upon the list of resources collected for Mr. Chase's AIMS presentation: "Easy Innovations: Web Tech Tools in the Classroom" from last year:

    Previous Post:
    1. EdTech Practices for 2012 - Tools for the Process of Learning

    'the view from the upstairs room' photo (c) 2010, waferboard - license: http://creativecommons.org/licenses/by/2.0/

    Tools to create unique learning Products

    These online resources are ideal for students and teachers to create unique digital products.

    Presentation Tools:


    • Online presentation tools - Break out of the PowerPoint mold and consider using alternative presentation tools in the classroom. Either implement them yourself as part of your instruction, or have students create presentations online.
      • Prezi - This unique presentation tool allows you to zoom in and out around a large canvas, creating meaning through spatial relation.
      • Projeqt (new) - This presentation tool pulls from various social media streams to create unique presentations with strong visual impact.
      • ThingLink (new) - Create rich images with music, video, sound, text and more. Share and discover deeper stories through images updated with your content and metadata. 
    • Online PPT Hosting - Share your PowerPoints online to gain a wider audience and encourage collaboration. Instead of forcing users to download files, online services allow you to upload PowerPoint files and add other features.
      • Present.me - With this service you can upload your PowerPoint and then record a video presentation to accompany the slides. The service offers a new educational pricing plan.
      • Slideshare - After uploading PowerPoints onto Slideshare, you can embed them on your Learning Management Systems, just like you would with a Youtube video.
    • Website Tours - More than just a collection of links, create a guided tour of web content to provide greater contexts for your students.
      • Jog the Web - Create a virtual tour of websites, walking users from one site to another with your notes.
      • Sqworl - Collect, annotate and organize your online resources in this clean, visual bookmarking site.
      • Weblist (new) - A simple repository of visual based links and resources.

    Writing:


    • Online Documents - Have students write online to easily work on assignments; no more worries about lost USB drives or problems emailing documents.  Also, with online documents, students can easily collaborate on the same project, or contribute to a large classroom assignment.
      • Titan Pad - This web-based word processor that allows for simultaneous collaboration including a section devoted to instant messaging with other users.
      • Quietwrite - Use this simple online writer for easily capturing text with minimal distractions through a browser.
      • Entri - Entri is a collaborative tool that lets you share articles before you post them on your blog. Invite others to collaborate, or just keep everything to yourself.
    • Making Websites - Let your students share their learning with a wider, authentic audience outside of school by creating a website. Many of these sites now let you easily create a website without extensive coding experience.
      • Jux.com (new) - Easily create websites, online slideshows, video, streetviews, all linked from a central account. These sites create a high impact emphasizing images and multimedia in pre-formatted templates.
      • Simplebooklet (new) - Use this website to create "slider"-based websites with a unique visual look. The program comes with a free account option, as well as other pricing options.
    • Blogs - Blogs are ideal for continually updating content for your audience, meaning they are great for keeping your students up to date with important dates and assignments.
      • Kidblog (new) - Kidblog is designed for K-12 teachers who want to provide each student with an individual blog. Students publish posts and participate in academic discussions within a secure classroom blogging community. 
      • Edublogs - This community contains blogs written by educators. Create your own edublog for use in the classroom, or just search for interesting blogs to follow.
      • Instablogg - Create instant, one post only blogs without an account for quick projects.
    • Wikis - Wikis allow you to create websites and then invite students to add content to the pages. Wikis can have various levels of control, but the idea is that students can collaborate together on one document, available on the web for a wider, authentic audience.
      • Wikispaces - Create a wiki for your students to allow them to collaborate on research assignments.
      • Hackpad (new) - This service lets you easily create a wiki that looks virtually like a collaborative document. 
    • Digital Publishing Services (new) - If you want your students to create unique digital text-based products, consider having them publish online with these resources. 
      • Lulu (new) - Use this service to have your students create their own print and ebooks
      • Flipsnack (new) - Create an online "Flipbook" from a PDF.

    Multimedia Presentation Tools and Resources:


    • Podcasting/Audio - Have students create podcasts or audio projects in order to easily work with audio. Audio projects are great for auditory learners.
      • Blabberize -
      • Voicethread - Create an account to use this great collaborative tool that lets students upload pictures and PowerPoint slides, personal commentary to each slide, and invite others to comment through voice, text, or video chat.
      • Audioboo - This tool and mobile app allows you to record and share audio with an authentic audience online.
    • Image Editing (new) - Let your students express their creativity with these photo and image editing services.
      • GIMP (new) - This free downloadable software is ideal for "such tasks as photo retouching, image composition and image authoring."
      • Be Funky (new) - Use this online editor to edit, add effects, frames and text to images.
      • Aviary (new) - This editing program lets you edit online, or through various downloadable apps.
    • Video and Animation - Students can create video or animation projects as unique final products. Video projects require students manage their time well, and be creative.
      • Goanimate - Create animation from animated templates, uploading your own voice or soundtrack.
      • Vialogues (new)- Private video-sharing service for discussions
      • My Storymaker from Carnegie Library of Pittsburgh (new) - This interactive format allows younger students to create their own stories using animated characters and objects.
      • Zimmer Twins (new) - Create an animated movie using Saturday-Morning Cartoon-style animated templates.
    • Screen Capture (and sharing) - Screen sharing services are ideal for emphasizing key concepts and using specific technology applications. With these incredibly easy-to-use screen casting tools, you can record and upload video in minutes.
      • Screenflow $99 – This software, the favorite of many bloggers and podcasters, allows you to “record the contents of your entire monitor while also capturing your video camera, microphone and your computer audio.”
      • Jing free (limited)/$14.95 per year – TechSmith, the makers of Camtasia, created this lightweight, easy-to-use screen capture software with both free and paid accounts.
      • Screenr free (limited)/variety of paid options- This web-based video recording system allows you to make webcasts without downloading any software.
      • Screencast-O-Matic free - Create screencasts of your desktop and access them online.
      • iShowU $29.95 – This Mac-only screen-casting allows you to easily record your screen, as well as your video camera and microphone.
      • Camtasia $99 – One of the first screen-capturing tools, TechSmith’s Camtasia offers versions for both Mac and PC and is ideally suited for your screen-capturing and editing needs.
      • ScreenChomp (for iPads) – This app by TechSmith allows you to turn your iPad into a screen-capturing tool.
    • Finding Free Multimedia Resources - Use these resources to find copyright-free images, audio and video for use in multimedia projects and presentations.
      • Creative Commons Search - Search various sites for copyright-free material.
      • Find Sounds - Search for sounds throughout the web
      • FreeSound.org - Freesound is a collaborative database of Creative Commons Licensed sounds. Browse, download and share sounds.
      • MorgueFile - Public image archive for creative images taken by photographers.
      • Office.com Images - Free images available from Microsoft.

    Visualizing Information:


    • Infographics - Infographics are modern equivalents of charts, graphs, and maps in which large data sets are visually represented. It is important for 21st Century students to interact with visual information
      • visual.ly (new) - With Visually’s free tools you can easily create beautiful infographics in minutes, and share them with others through the social interface.
      • Chartle - Easily create complex online visualizations with this website.
      • Wordle - Upload text to create word clouds that make it easy to see the most common words used.
    • Mind-Mapping - Mind-mapping tools allow you to easily create flow-charts, word maps and more. These collaborative resources have interesting features.
      • Popplet - Create online mind-maps by easily dragging and dropping. Invite others to create accounts and contribute to your map.
      • Bubbl.us - Use this free website to easily create mindmaps
      • Northwest Missouri State University Mindmap - This free website lets you create a mindmap, with the option to save or print your work.

    Friday, September 21, 2012

    EdTech Practices for 2012 - Tools for the Process of Learning

    In order to kick off your use of technology in the classroom this year, consider incorporating one of these online tools into your classroom!

    This series of posts reiterates and expands upon the list of resources collected for Mr. Chase's AIMS presentation: "Easy Innovations: Web Tech Tools in the Classroom" from last year. (Resources that did not appear in that presentation are marked here as "new.")

    'Day14-geared-up' photo (c) 2008, Lotus72 - license: http://creativecommons.org/licenses/by-nd/2.0/

    Tools to enhance the Process of learning

    These online resources are ideal for students and teachers to enhance the learning process.

    Research Tools:

    • Content Curation: Use online bookmarking systems and reader sites that allow you to subscribe to the Internet. 
      • Pinterest - Share websites and images you find online on a virtual board. Invite others to share similar images on your board.
      • Pocket (Read it Later) (new) - Create an account with this service to easily bookmark articles and read them later. This service also formats articles with a clean background, removing flash ads for easy reading. Read it Later also offers robust mobile integration.
      • Google Reader - This Google service allows you to subscribe to “feeds” of information across the web. Keep track of new blog posts, comment threads, and more, all in one place.
    • Landing Pages: Instead of using Yahoo or Google as your homepage, make your own website with easy-to-access links. Consider creating pages for your students in order to easily drive them towards appropriate content.
      • Symbaloo - Use Symbaloo to create a web presence filled with bookmarks of your own choosing. You can organize the bookmarks within the intuitive interface in any way you choose.
      • Only 2 Clicks - Use this site to create an account and quickly access your favorite bookmarks in under 2 Clicks. Organize links in clickable folders.
    • Task Management / To Do Lists:  These sites allow users to manage tasks efficiently, with robust notifications and mobile apps to accompany the online experience. Use these websites to keep yourself on track. These sites would also greatly help students who struggle with organization and deadlines.
      • Any.do - (new) This Chrome extension is based on the popular Android and iPhone app to have quick and instant access to your to do lists.
      • Remember the Milk - This simple, free website helps you manage your tasks with a variety of services and apps, including iPhone Siri as well as Gmail integration.
    • Note-taking: Never lose your notes again! With these online tools you can access your notes from anywhere and collaborate with others by sharing with a larger group.
      • Evernote - With a variety of ways to create and store notes, Evernote is an ideal system for note-taking.
      • EasyBib / Noodle Tools (subscription-based) - Each of these services combines note-taking with citation manaagement.
    • File Management: If you forget to frequently backup files, and are sick of saving to email, consider creating an account to one of these services so you can access your files from anywhere. 
      • Dropbox - With Dropbox, you can seamlessly create backups of all your important documents so you will never lose important files again!
      • Google Drive (new) - Google's updated Google Docs system comes with a great downloadable application to sync your online docs with your desktop.
    • Citation: Make the research process easier for your students by using these citation resources
      • EasyBib / Noodle Tools (subscription-based) - Each of these services combines note-taking with citation manaagement.
      • Bib Me - This easy-to-use bibliography site focuses on one thing, and does it well: creating free bibliographies.

    Communication Tools & the Social Web:

    • Learning Management Systems - An LMS is a website or web-app that helps teachers organize classroom content and learning through the use of online learning objects, discussion forums, and even interactive assessments. For more information, read Mr. Chase's article "Blending Learning: Learning Management Systems"
      • Moodle - Free and open-sourced, Moodle is an extensible course management system, currently used by Capital City PCS.
      • Edmodo - This social based learning management system is easy to set up, and is sure to engage students.
      • Canvas (new) - This robust course management system provides multiple features with a clean interface. 
    • Online Study Groups: Encourage your students to use the power of social media for good!
      • eNotes (new) - This site offers homework help in addition to study guides and other educational resources.
      • Hoot.me - Turn Facebook into a study center to encourage students to connect with classmates and tutors.
    • Online flashcards: These online tools digitally recreate the act of quizzing with flashcards and are ideal as study aids.
      • Quizlet - Create flashcards with your own terms and definitions, or search from a database of flashcards. Share your flashcards with classmates, or assign them to students.
      • Easy Notecards - Search from an extensive library of user-created notecards, or create and share your own.
    • Backchannel - Consider creating a "parking lot" on the fly by having students use instant messaging services to pose questions and take collaborative notes
      • Today's Meet - Easily create and share a chat room without the need to create registered accounts.
      • Chatzy (new) - Free, private chat rooms without registration
    • Video Conference:  Go beyond the walls of your classroom by letting your students interact with others across the country or world. 
      • Skype - The industry-standard of web-based communication, Skype allows for audio-only, or video chat.
      • Facetime (new) - This Mac-app for OSX and iOS allows you to easily connect with other Mac users.
    • Polling: Like clicker systems, online polling sites give you instantaneous feedback from students. Easily create and conduct formative or summative assessments online.
      • Poll Everywhere / Mentimeter (new) - These polling systems allow teachers to easily create polls, but require students answer with their own mobile devices, or through a link online.
      • Google Form - Use your google apps account to easily create a form, sharing it with students in your classes.
    • Petitions/Real World Audiences: Allow your students to work on more meaningful projects by engaging in real world audiences. These sites are ideal ways for students to make a real, significant impact on their world.
      • Care 2: The Petition Site - Start a free petition and share it with your friends and the world.
      • Change.org - Start a petition, mobilize support and advocate for change.
      • See Click Fix - Use this site to report neighborhood issues and see them get fixed. Great for fixing local issues.

    Tuesday, September 18, 2012

    Website of the Week: GoAnimate for Easy-to-Create Animations

    GoAnimate Videomaker is a website that allows you to build an animated video using customizable templates. While the site pushes you towards creating a pro account, you can still use the program with a free account.
    Screenshot from Go Animate Election Videomaker:
    http://goanimate.com/videomaker/quickvideo/election

    Creating videos is an easy 4-step process:

    1. Choose a setting like the 2012 Elections, Anime, or "Epic Ninja Battle."
    2. Select your actors
    3. Type in or record your dialog.
    4. Login or create your account to preview your video

    Ideas for Use:


    1. Consider using GoAnimate to easily create animation prompts to introduce a topic or spice up your lessons.
    2. Have students create their own videos to explain concepts in the classroom, or present two different viewpoints about a subject.

    Thursday, September 13, 2012

    GIMP as a Photoshop Replacement

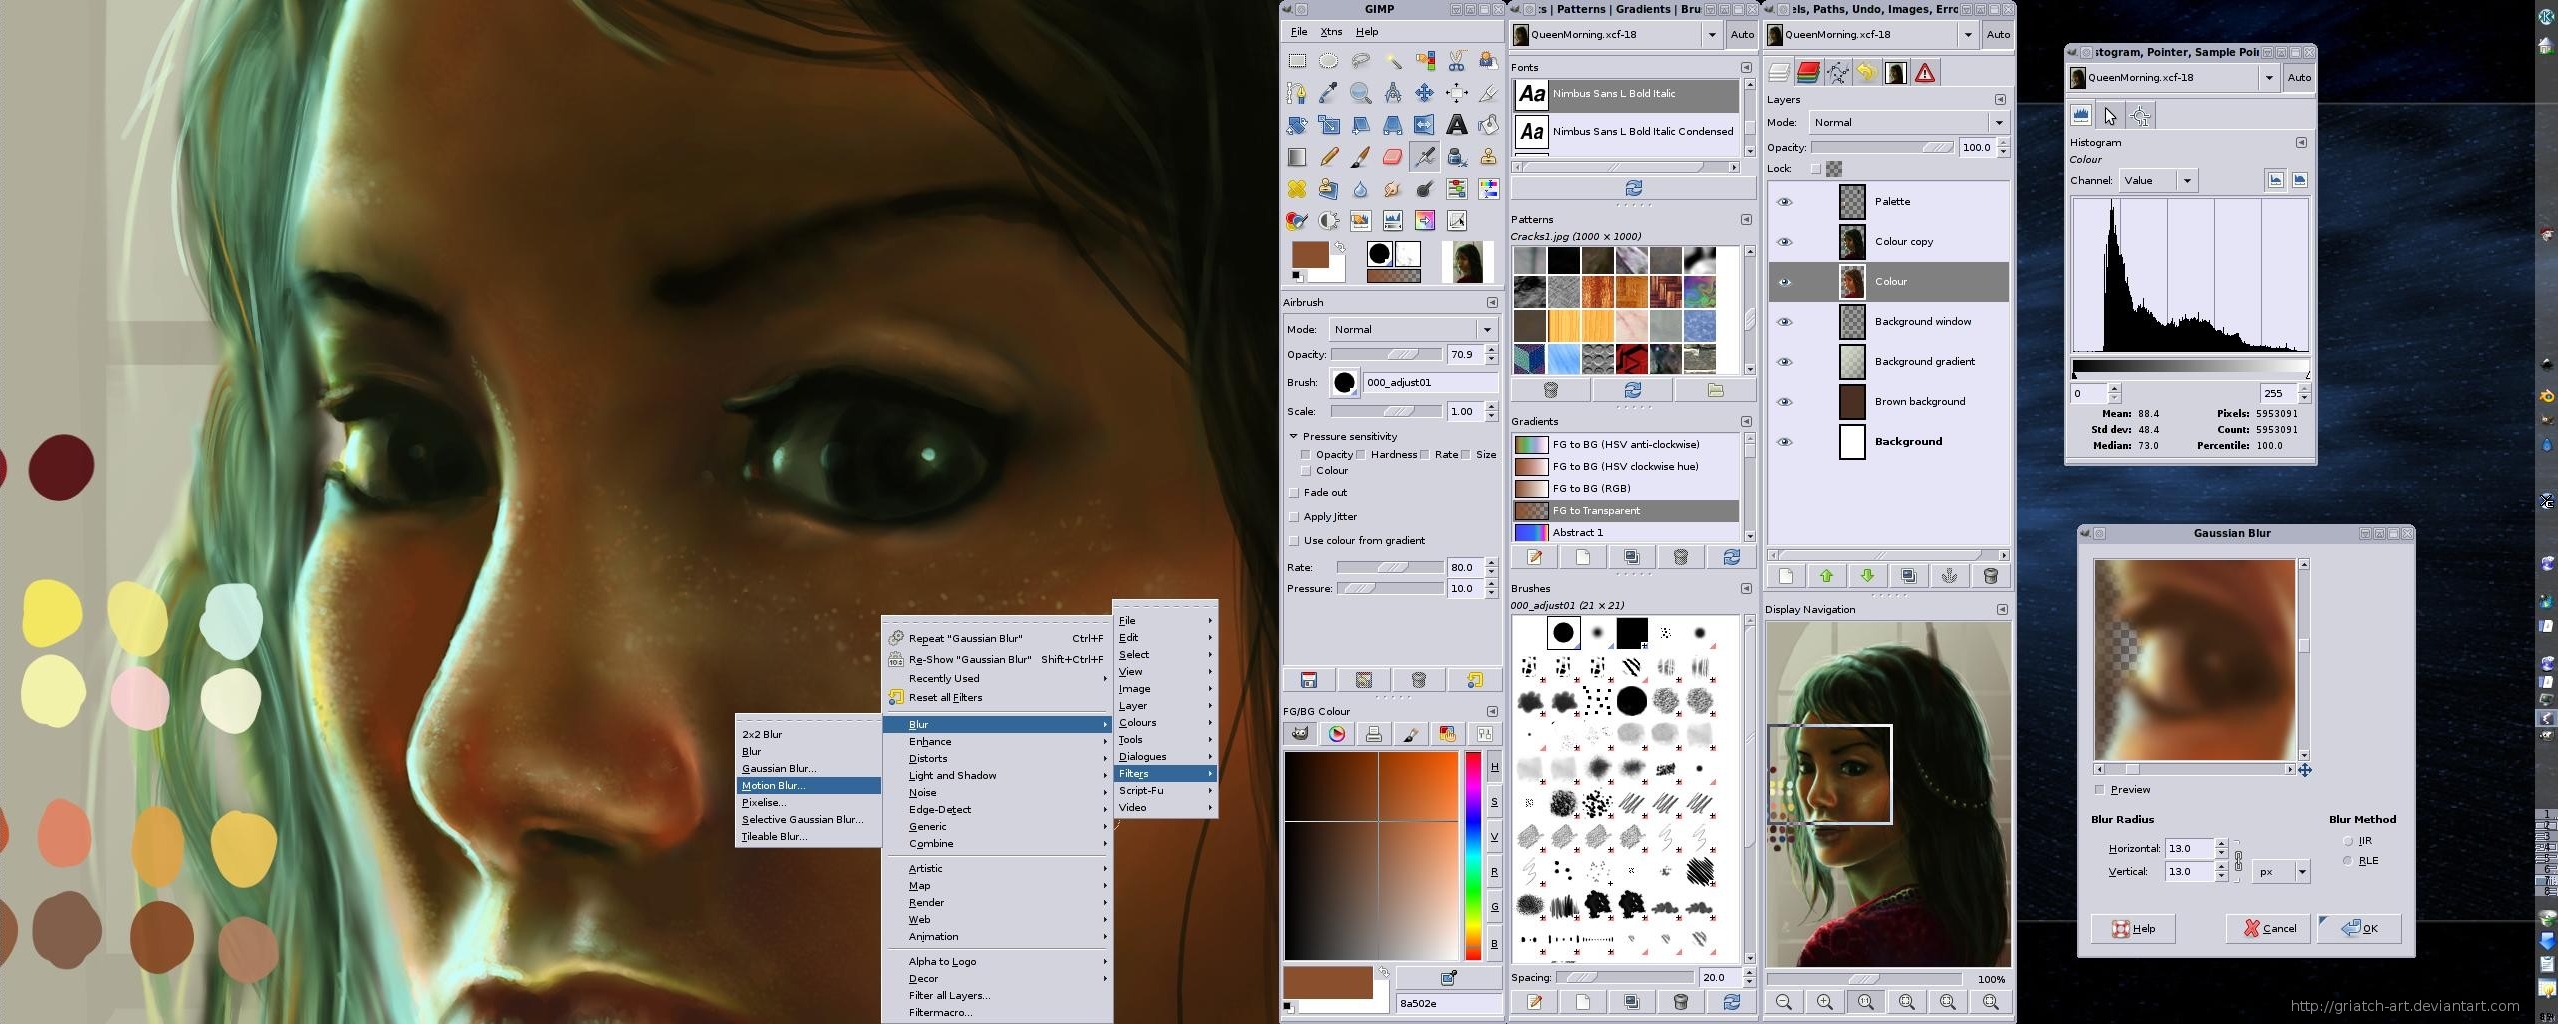
    Are you itching to let your creative juices loose but don't have a copy of Photoshop on your computer? Consider using GIMP (GNU Image Manipulation Program)! This free software is ideal for "such tasks as photo retouching, image composition and image authoring."

    Image from http://www.gimp.org/screenshots/

    To learn more about how to use GIMP, check out the extensive list of tutorials located on the GIMP.org website: http://www.gimp.org/tutorials/

    Wednesday, May 2, 2012

    iPad App of the Week - Goodreader

    This week's iPad App of the week is Goodreader.


    Goodreader is a great app that lets you read PDFs and TXT documents on the fly. Sync with Dropbox or Google Docs for easy access to PDFs on your iPad.

    Best of all, you can extensively annotate your PDFs with objects like rectangles, lines and arrows; highlighting and underlining in multiple colors, and even sticky notes.


    Tuesday, May 1, 2012

    Website of the Week - TedEd Beta

    TED-Ed is Website of the Week!


    With the TED-Ed site, the famous lecture series has begun its foray into online learning. Seemingly influenced by the Khan Academy, TED-Ed combines "carefully curated educational videos" with a user-friendly learning platform. Each of the videos on this page are lectures by established educators, effectively animated by educators from around the world.

    The learning platform includes quizzes, writing prompts, and links to other sources, "users can distribute the lessons, publicly or privately, and track their impact on the world, a class, or an individual student." You can also "Flip" any lesson, putting your own stamp on it.


    1. To get started, create an account with TED. 
    2. Choose one of the existing lessons. 
    3. Click on "Flip this Lesson" to customize your own lesson. 
    4. Select or Deselect Quick Quiz and Think questions. 
    5. You can also add your own deep reflection questions in the Think section, as well as your own resources on the Dig Deeper section. 
    6. Click on Publish to get a unique URL. 
    7. Email this to students in order to track their progress.


    For more information, watch the Tour video: http://ed.ted.com/tour

    Friday, April 27, 2012

    Tip of the Week - Searching your Computer with Spotlight

    Did you know that you can search your Mac computer for files just like how you would search Google for websites?

    In the very top right corner of the Menu bar on Mac computers, there is a "Spotlight" icon:


    You can also press Command + Spacebar on the keyboard to open the spotlight search window

    After clicking on this icon you should see a Spotlight search bar. Search this bar for quick access to open applications, specific files, folders, email messages, dictionary definitions and more. 


    Just click on the results to launch an application or open an a file. If you don't see what you want, click on "Show All" to open a Finder window of results.

    For more great tips on how to use Spotlight to search your computer, check out Whitson Gordon's article on Lifehacker: All the Awesome Spotlight Shortcuts You Didn’t Know Existed

    One of the tips from this post:
    Make Advanced Search Queries
    • You can search for files of a specific type by using the kind operator, e.g. invoice kind:pdf.
    • You can search for files from a specific date range using operators like created or modified, e.g. invoice modified:yesterday for something modified yesterday, or invoice created:1/1/2012-4/10/2012 to find something created in between January 1st and April 10th.

    Tuesday, April 24, 2012

    Cool site of the Week: Instagrok

    http://www.instagrok.com/


    Instagrok is a unique search tool, that shows your search results as part of a concept map with easy access to key facts, videos, images, quizzes, and like concepts.  After creating an account, you can easily "pin" your search queries onto journals that you can then email or print.

    As Openlearner tweeted, Instagrok seems like Google "rebuilt with education in mind."


    For more information, take a look at the Instagrok PDF Brochure.

    Monday, April 23, 2012

    Article of the Week: Larry Cuban's "Connecting School Reform to Online Instruction in K-12 Classrooms: The Next New Thing"


    This week's article focuses on how online education is frequently being referred to as the "next new thing" in school reform, although Larry Cuban is skeptical of how this transformative technology will reform education.

    In this article, Cuban argues, "those high expectations for online schooling, like earlier incarnations of technological  'new things,' will fade as the political realities of wholesale restructuring of schools and classroom practices without widespread cooperation of teachers become apparent."

    From the article:
    ... bringing high-tech devices in schools to transform teaching, learning, and bring schools into the 21st century must be seen within the larger picture of U.S. public schools as targets of structural reform for the past two centuries. Here is the place, then, to note that K-12 online instruction is being promoted as a “disruptive innovation” that will transform, even eliminate, the age-graded school–introduced over 150 years ago–into places that will permit students to proceed at their own pace in learning and achieve at higher levels than in self-contained classrooms with one teacher and 25 to 30 students. Online instruction in K-12 will revolutionize teaching and learning. Again, the technology is the lever that will upend the traditional world of schooling, the overall target of reformers.

    To read this article, visit Larry Cuban's website:
    http://larrycuban.wordpress.com/2012/04/13/connecting-school-reform-to-online-instruction-in-k-12-classrooms-the-next-new-thing/

    Wednesday, March 21, 2012

    How to create a teacher-managed blog using Blogger

    If you are not comfortable with letting students run rampant with their own blogs, you can always create your own teacher-managed blog to maintain control.  Students can still contribute to such a blog through comments and discussions.

    To set up a blog, follow the directions on the previous post: "How students can create their own blogs for personal reflections

    Setting up permissions 


    Using permissions, you can make your blog private to only you and your students. To change permissions, follow the directions below

    1. In the dashboard dropdown, click on Settings. This takes you to the "Basics" settings page.
    2. Click on "Edit" in the Blog Readers section.
    3. Change your option from "Anybody" to either "Only Blog Authors" or "Only These Readers." When adding students as blog authors, they will be able to post to your blog. By manually adding students as readers, you can . 
    4. After choosing to add students as readers, manually add their email accounts to this page.


    Setting up comments 


    With blogs, you can turn off comments completely, turn them on with moderation, or turn them on so they display automatically. To change permissions:


    1. Go to Settings > Posts and comments
    2. Change the "Who can comment?" option to only users with Google Accounts, or only students who are members of the blog.
    3. Change the "Comment moderation" section from "Never" to "Always" or "Sometimes"


    How students can create their own blogs for personal reflections

    Google hosts a variety of web apps, including Blogger, an easy to use blog platform. With Google Apps for Education, we can provide our students access to their own blogs, managed by the school.

    Creating a blog with Blogger


    To create a Blogger blog using a Google Apps for Education account, your network administrator will need to turn on access to Blogger.

    At Capital City PCS, we have decided to turn off Blogger for all students unless their guardians sign and return a copy of the Blogger and Picasa Terms of Service. Once these forms are on file, we will turn on a student's Blogger account.


    2. Sign in with your school email account
    3. On the next screen, choose a "Display Name" that will be associated with your Blog. Check the Terms of Service box, then click "Continue."


    3. You will be taken to the Blogger dashboard. Click on "New blog" to create a new blog.


    4. On the next screen, create your blog by adding a title, choosing a unique address, and your starting template (which you can always change later.) Click on the orange "Create Blog!" button to create your blog.


    5. Your blog will now appear on your Blogger dashboard. Click on the orange New Post link to quickly create a new post. Click on the grey "Post List" to see all of your blog posts. Click on the drop down to access additional options quickly. Click on "View Blog" to see the live blog page.


    Writing a blog post


    Once you have your blog created, you can begin writing your first blog post.

    1. Add a title for your post.
    2. Type your blog in the main section on the website. Use the "What You See is What you Get Editer" (WYSIWYG) to update styling and more.
    3. Add labels at the right side of the screen. This way you can easily make your blogs searchable by subject.


    Recommendations for setting up blogs for reflection


    There are different ways that schools can go about setting up a blogging program to capture ongoing reflections. Here are a few ideas for setting up a successful blog reflection, ideal for our Capital City PCS portfolio model.

    • Require weekly reflections in all subjects either as homework, or as part of curricular instruction. By using a blog for these quick reflections, students can easily contribute to their blog's body of work.
    • Require each blog post to have multiple labels. One label can be for subjects, (Math, Humanities, etc.), one label can be for thoughts about the assignment (whether good, bad or in-between), and one label can be specific to an expedition or project.
    • Make blogs private, or only viewable with a CCPCS email account. 
    • Open some blog posts for commenting to encourage communication amongst students.
    • Use links to refer to previous blog post reflections and external websites and google docs.

    Schools that are blogging with students


    Check out these sites for great examples of student blogs in action. Blogging has become an integral part of the curriculum at these schools:


    These articles and blog posts contain links to exemplary student blogs:


    For more information


    For more on how to use blogs in the classroom, read this post on Mr. Chase's other blog, Make EdTech Happen: Blogging with Students for Reflection, Collaboration, and Literacy


    Tuesday, March 20, 2012

    How to create a Google Sites template for your students

    One of the great things about Google Apps is how you can easily create templates for your students.  In the same way that you might create a template in Google Docs, you can easily create a website, and then share it with your students as a template.

    To do this, simply create your website like you normally would. Once your website is just how you want it and ready for students to begin adding content, follow the instructions below.

    Note: Once your students begin creating a website from your template, you cannot go in and make changes to your template expecting those changes to effect the student sites. Those pages will now exist separately from the others.

    1. Go to More > Manage Site at the top right of the webpage.

    2. On the main Manage Site page, click on "Publish this site as a template" in the middle of the page. 


    3. On the next page, choose how you will be listed as author (full name or user name), name your Site Template, and enter a description of your site. Then click the red "Submit" button.


    4. After you click submit, a blue bar will appear at the top of the screen, and on the middle of the page a link will appear.


    For directions on how your students can create a website using your template, follow these directions.

    Monday, March 19, 2012

    Creating a Google Sites Website from Scratch

    With a Capital City PCS Google Account, students not only have access to Gmail, but also powerful online tools like Google Sites.  Google Sites are an ideal tool for students to easily create their own website.

    Accessing Sites


    Students can access Google Sites after logging in to their school email account by clicking on the "Sites" link at the top of the screen.


    Once on Sites, students can easily click on the big red "Create" button to begin creating a site.


    On the next page, you can choose to create from a blank template, or browse from a list of templates to give your website a shape.  For more information about how to create a site from a Google Template, read this blog post.

    Choosing Styles and Templates

    After choosing a template or going with a blank template, you must name your site, change the site location (or web address,) and if you would like, choose a new theme. You can also change the privacy settings to make your site more secure.


    Editing your Google Site


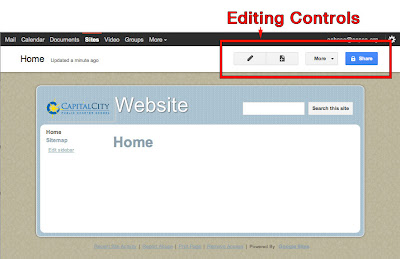
    Once you have created your Google Site, it is fairly easy to edit your page. On the newly created site, you should see a white bar above the page with the title of the page, as well as 4 icons. These icons let you control your website


    1. Edit Page


    Click on the first icon in order to edit the site. After clicking this button, a "What You See is What you Get" editor will appear. Additional dropdown options including Insert, Format, Table and Layout will be available as well.


    2. Add New Page


    Click on the second icon to add a new page. After click on this button, you will be prompted to name your page, choose the template for the page, and then select the location under which the site will appear.


    3. More Features


    The third icon lets you access all other features, including the important "Manage Site" section. Click on this button to access a drop-down of options.


    4. Share


    The fourth icon lets you update the sharing of your site in order to make it private, or accessible for more people. Add user email addresses in order to share access to your site.

    Announcing New Tech PD in 30 - Blogger and Google Sites with Students

    For the next two weeks, the Tech PD in 30 Minutes session will focus on how teachers can use blogs and websites in the classroom with Google Apps for education. These sessions are designed to be completed within one planning period. Sessions will also be held after school.

    Check out the Tech PD in 30 website for more information.

    3/19- 3/30
    Blogger and Google Sites with Students
    In this session, teachers wil learn: